We may earn money or products from the companies mentioned in this post.
This school uniform cardigan sweater is styled to have you fit right in as a Hogwarts© student. The pattern is a favorites in our collection of free wizard wear knitting patterns and it is drafted in an X Small Misse’s size 4.
As a Harry Potter cardigan sweater, it features a V-neck, a five-button front closure with ribbed button and front bands. The cardigan has classic tapered full-length set-in sleeves with ribbed cuffs.
In a hurry to knit a cardigan? Buy the Spinrite Patons Next Steps Three Create Cardigan or get all the details in My First Cardigan Workbook
School Uniform Cardigan Sweater: Miss X-Small
“Ingredients”:
- LK 150 knitting machine OR knitting needles US#7 and US#5 OR size needles required to achieve an accurate stitch and row gauge.
- 14 Ounces of Patons© Classic wool yarn [$55.92 plus tax]
- [5] 3/4 inch buttons [$4.50 plus tax]

Stitch and Row Gauge: Sweater is knit in stockinette stitch – alternate rows of knit (plain) and purl stitch. Gauge is 20 stitches by 26 rows over 4 inches [10cm]. Bands are worked in 1 x 1 ribbing.
Miss X-Small – Designed to fit a 32-inch bust.
Finished Sweater Measurements:
- Chest: 34 1/4 inches [87 cm]
- Width at ribbed bottom edge: 34″ [86 cm]
- Sweater Length: 22 1/2″ [57 cm]
- Sleeve Length: 16 1/2″ [42 cm]
- V-neck depth: 8 1/2″ [21.5 cm]
- Back shoulder width: 13″ [33 cm]
 Sweater Measurement Details:
- Ribbed hem depth: 2 1/2″ [6.3 cm]
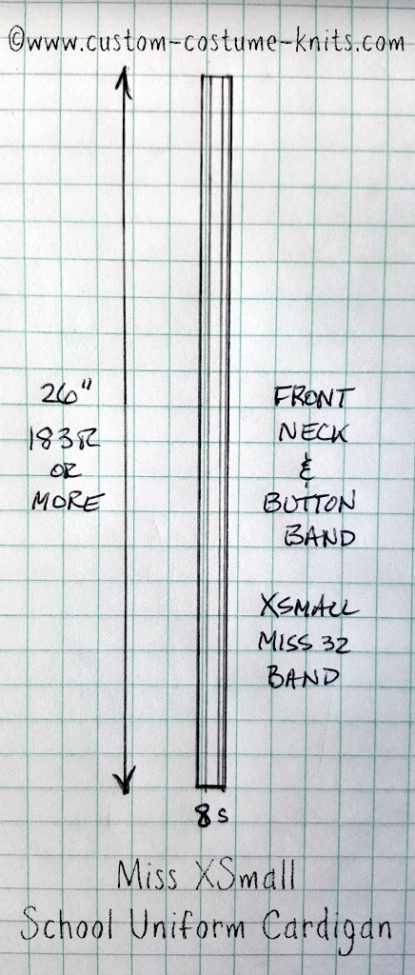
- Front button-band width: 1 1/4″ [3 cm]
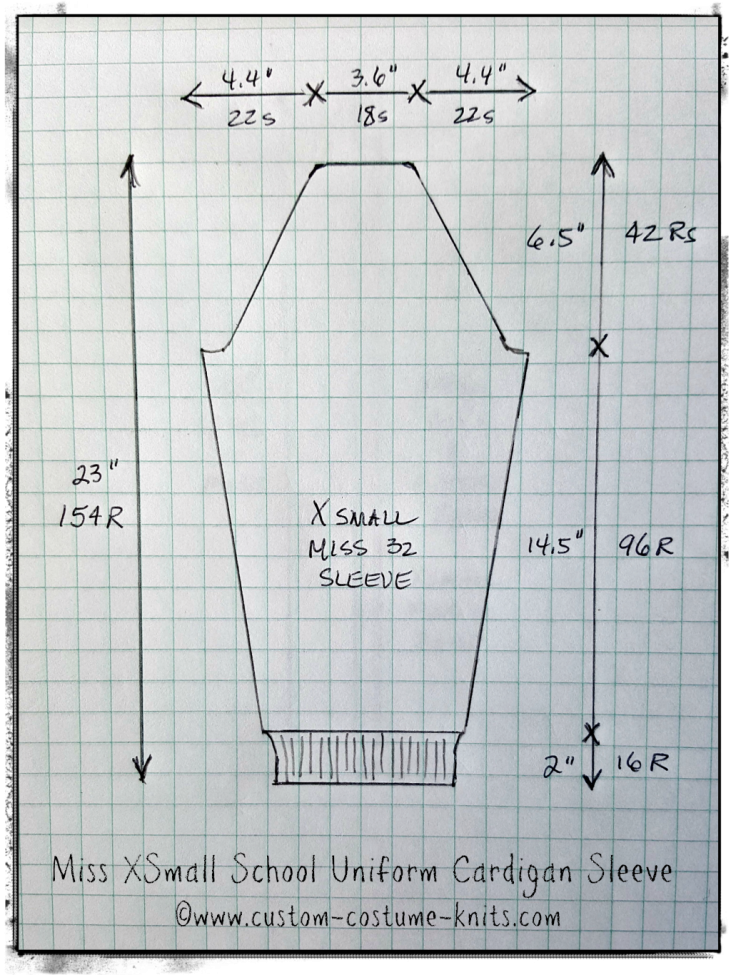
- Sleeve cuff depth: 2″ [5 cm]
- Width of sleeve width at cuff: 7.”
- Sleeve width above cuff: 7 3/4.”
- Sleeve width at widest point: 12.”
- [5] 3/4 inch buttons [2 cm]
NOTE: Please read all knitting instructions completely before starting to knit. There may be sections where two sets of shaping instructions are worked at the same time – such as necklines and shoulder shaping. Row count is given for each section of the sweater.
Read detailed instructions for the stripe pattern in School House Colors.
School Uniform Cardigan Sweater Pattern
“Directions”:

Back:
Using main color, cast on 87 stitches on US#5 needles. Work in [Knit 1, Purl 1] ribbing for 2 1/2 inches.
- Increase by one stitch for 88 total stitches or simply cast on 88 stitches.
Change to US#7 needles and continue in stockinette stitch. On row 2 begin stripe sequence for House colors. Once the stripe is finished continue in main color. Work even until the back piece measures 11.1 inches or 72 rows, excluding the hem.
Begin armhole shaping.
- Cast off four stitches at the beginning of the next two rows.
- Decrease one stitch at each end of every alternate row for 12 rows – 68 stitches remaining. Place a yarn marker at each edge.
- Continue on 68 stitches until armhole measures 8 inches [52 rows].
Shape Neck. Work both sides at the same time.
- Work 22 stitches.
- With a second ball of yarn, cast off the next 24 stitches. Place a yarn marker at the center of these 24 stitches .
- Knit the remaining 22 stitches.
- Decrease 1 stitch at neck edge every row 3 times, until 19 stitches remain.
At the same time, when armhole measures eight inches [row 52], start the shoulder shaping.
Begin shoulder shaping.
- Cast off 9 stitches at armhole edge, then cast off 10 stitches at armhole edge.
 Front:
Note: Neckline decreases for the School Uniform Cardigan Sweater are made 1 stitch from the edge.
Cardigan right side is worked first.
- With main color, cast on 41 stitches on US#5 needles. Work in Knit 1, Purl 1 ribbing for 2 1.2 inches [18rs].
- Increase 1 stitch on the last row for a total of 42 stitches.
- Change to US#7 needles and stockinette stitch. On row 2 begin stripe sequence for House colors. Once the stripe is finished continue in main color. Work even until right front piece measures 11.1 inches or 72 rows, excluding hem.
- Begin armhole shaping. Decrease for armhole at LEFT END, following the directions for the back armhole. Place a yarn marker on armhole edge when decreases are completed.
At the same time…
Begin neck shaping.
Make all neckline decreases 1 stitch IN from the edge so you have a clean edge when sewing on the band.
- Decrease 1 stitch at neck edge (RIGHT END) of the next row, then every 4th row 12 times, until 19 stitches remain.
Work even until armhole measures 8 inches (52 rows).
Begin shoulder shaping. Cast off as for back shoulder.

Sleeves:
Note: M1 (make 1) increases on the School Uniform Cardigan Sweater are made 1 stitch in from the edge so that you have a clean even edge to attach the band.
- With main color, cast on 37 stitches on US#5 needles. Work in Knit 1, Purl 1 ribbing for 2 inches.
- Increase 3 stitches evenly across the row for a total of 40 stitches.
- Change to US#7 needles and to stockinette stitch.
- On row 2 begin stripe sequence for House colors. Once the stripe is finished continue in main color.
- Increase 1 stitch at each end of every 8th row 11 times to 62 stitches [88 total rows, excluding hem].
- Work even until the sleeve measures 14 1/2 [96 rows]. excluding hem.
Shape sleeve cap:
- Cast off 4 stitches at beginning of the next two rows. [54 stitches remaining].
- Decrease 1 stitch at each end of every 2nd row 7 times
- Then decrease 1 stitch at each end of every 3rd row 4 times
- In the last decrease step, decrease 1 stitch at each end of every 2nd row 7 times.
- Cast off the remaining 18 stitches loosely. Place a yarn marker in the middle of these 18 stitches.
Finish Shoulder Seams:
Sew both fronts to back along shoulder seams using your preferred seaming method.
 Button Band/Neckband:
Cast on 8 stitches on US#5 needles. Work in Knit 1, Purl 1 ribbing for 26 inches.
At this point, check the length of the band to ensure it is long enough when slightly stretched, to go up the cardigan front, from bottom front to center back of the neck.
Continue to knit in 1 by 1 ribbing if needed.
Cast off ribbed stitches. Sew the button band to the LEFT FRONT for women and girls.
Mark positions for 5 buttons (we use these buttons) with the first button about 1/2 inch from cast on edge and the last button a couple rows before the start of the V-neck shaping.
The remaining buttons should be spaced evenly between the first and last button, a little more than 3 inches apart.
You will work the buttonhole band as for button band, working buttonholes at the previously marked positions as follows:
Buttonhole Band:
- With the right side of the work facing, rib 2 stitches, cast off the next 2 stitches, rib to the end.
- On the next row, rib 4 stitches, cast on 2 stitches , rib to the end.
Sew the buttonhole band to the cardigan front. Carefully adjust button placements to correspond with buttonholes.
Now you can sew the buttons at the marked positions on the button band. When sewing the buttons, leave a 1/2 tail after tying the knot so you know where the button sewing thread is located.
You don’t want to accidentally cut into the ribbing if you need to replace or re-attach a button.
I’ve also used Dritz button pins worsted and bulky weight bands to make it easier to change or remove shank buttons.
For a permanent button attachment, you can use a backing button, lighter weight yarn in the same color instead of thread using the method seen in the video below.
To make up for the thickness of a worsted weight button band be sure to create a small shank using the sports weight yarn.
Finishing:
The Essential Guide to Finishing Handknits
Sew the sleeves to the armhole, matching yarn markers and easing in to fit.
We use a chain stitch with a sports or fingering weight yarn to “sew” the pieces together.
Sew the side and sleeve seams using a mattress stitch.
Sew any remaining seams.
Be sure to darn, weave or sew in all loose ends.
&
&
Amount of yarn required:
A little more than 14 ounces of yarn in total. Buy all main color yarn in the same dye lot . I purchased:
- Five skeins for the cardigan
- An extra skein to knit an accurate stitch and row gauge swatch
- One each of the two contrasting House colors.
The Knitter’s Book of Finishing Techniques Knit Finishing Techniques
&
Sample School Uniform Cardigan Sweater:
We’re working on a sample School Uniform Cardigan Sweater knit using these exact instructions. Photos of the completed project will be added as soon as possible.
Grab your favorite knitting needles! Cast on, cast off, increases and decreases, and a smooth mattress stitch to finish the side and sleeve seams – with these basic knitting techniques, you can get started with a simple School uniform cardigan sweater in your choice of House colors!